
Thank you for purchasing COLORCODE VJ.
COLORCODE VJ is an iPad app for creators of movies and music, designed to withstand both professional and hobby uses.
While being simple in design, COLORCODE VJ offers a full set of unique features. Further enhanced by the portability of your iPad, COLORCODE VJ opens the door to a new VJ experience. We hope you have great fun with the app.
COLORCODE VJ is a simple VJ app. You can mix and simultaneously display up to 2 movies, 5 images, 1 text, and 1 particle. (*1)
Movies are assigned to either of 2 buses, A or B, and can be mixed arbitrarily using the cross fader.
On the stage(preview screen), you can touch and move or pinch and zoom still images(JPEG/PNG) in real-time. PNG transparency is supported, allowing you, for example, to overlap animation characters onto movies. You can also add simple motions(animation effects) to images and texts for more advanced expressions.
With the particle function, you can touch & drag on the stage to start displaying particles from that position. The feature is useful for adding decorations and accents to your movie in real-time.
COLORCODE VJ has been designed for use with an external display. While you can enjoy various VJ plays with your iPad alone, we strongly recommend using an external display. (*2)
COLORCODE VJ can play the Audio track of a movie file. This option is in setting view. Default is off. When you output the audio increases the CPU load.
COLORCODE VJ is a memory-intensive app. We suggest closing all other apps before launching COLORCODE VJ.
Refer to the following URL to force recently used apps to close.
https://support.apple.com/kb/HT4211?viewlocale=en_US
Various apps are available for freeing up memory on your iPad. You may also wish to use these apps for ease of maintenance.
As of Ver 1.6.0, internal cameras can be used as video sources.Either front, back can be used.
[Notice] A dialog asking for permission to access the camera is displayed at startup, so please give permission. If it is not displayed, or if you can not use the camera, please make settings with iOS settings app -> privacy -> camera.
(*1) Smoothness of operation will depend on the resolution of your movies and images, hardware performance (iPad vs. iPad 2), and various settings. Use of iPad 2 is strongly recommended.
(*2) Connection with an external display requires an Apple genuine adapter. Lightning Digital AV Adapter,Lightning to VGA Adapter, Apple 30-pin Digital AV Adapter, Apple Composite AV Cable, Apple 30-pin to VGA Adapter. But you can't use Lightning to 30-pin Adapter or Lightning to 30-pin Adapter.
COLORCODE VJ is capable of mixing and displaying various media, arranged onto separate layers. Understanding this layer structure will aid you in better performing a smooth VJ play.
Since the Images layer is above the Movies layer, note that a large image may cover the entire movie. In addition to the above, there is also a customizable background layer below the Movies layer.
COLORCODE VJ has 2 modes of operation. Understanding the function and capability of these 2 modes is essential in using COLORCODE VJ.
EDIT mode is used for "preparation" of your VJ play.
In EDIT mode, you can load movies and images, input texts to be displayed, and select particles to be used.
You can also configure motion for your movies, images, and texts.
This is also where you configure various app settings.
PLAY mode is used for the actual VJ play.
The media pool turns into a set of buttons for loading media onto the stage.
Various controllers (buttons and sliders) for playback become enabled.
Simply put, the rest is up to you.
The operation mode is switched by sliding (dragging) the slider at the bottom left of the screen. A sliding switch has been adopted to prevent unintentional switching of the mode during your VJ play.
Ver1.2.0 or later, after you change mode from PLAY to EDIT, movies does not stop (A-bus Only. Since it is OFF by default , turn ON this option on the settings view.).
This section describes the main screen of COLOR CODE VJ. The main screen is largely divided into 4 sections.

(1) Music Player section
This section provides functions for playing back tracks from the iPod library. You can register multiple tracks into the playlist.
While the Music Player is independent of the VJ functions, playback will stop when the mode is switched.
[NOTE] DRM protected tracks purchased on the iTunes Music Store cannot be played. iTunes Plus tracks are DRM-free and can be played.
(2) Controller section
This section provides the "stage" for previewing the main output, as well as controllers for the media.
This section is only available under the PLAY mode (more details later).
(3) Media Pool section
This section is used to register movies, images, texts, and particles for use during the VJ play.
The media pool can be divided into up to 6 banks (Bank1 - Bank6).
(4) Global & Edit section
This section provides mode buttons for switching the operation mode of COLORCODE VJ.
Switching the mode will change the function of this section itself. For example, under the EDIT mode, you can load and layout media into the media pool.
You can also access the settings screen from this section.
(Access to the settings screen is disabled under the PLAY mode.)

(1) Track information: Displays the title, elapsed time, and length of the track.
(2) Back button: Skips to the beginning of the track. When already at the beginning of a track, skips to the previous track.
(3) Play/Stop button: Starts/stops the playback of the registered track(s).
(4) Next button: Skips to the next track.
(5) Open File button: Loads one or more tracks from the iPod library to create a playlist. The tracks will be played back in the order in which they were loaded. To change the order of the tracks in the playlist, touch this button again and reload the tracks from the beginning.
[NOTE] DRM protected tracks purchased on the iTunes Music Store cannot be played. iTunes Plus tracks are DRM-free and can be played.
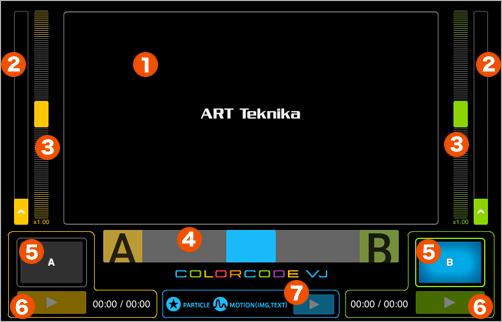
(1) Stage: Displays a preview of the main output. The stage also acts as a controller, with which you can move/zoom images and trigger particle effects.
(2) Seek bar: Displays the current position in the movies loaded into buses A and B.
The first frame is positioned at the bottom, and the last frame at the top.
Move the slider thumb to skip to the desired position.
You can also tap the bottom of the slider to skip to the first frame of the movie.
(3) Speed control: Controls the playback speed of the movie. The control range is 0x (paused) to 2x. You can tap the bottom, center, or top of the slider for a quick speed change.
(4) Crossfader: Adjusts the mix balance for movies A and B. Drag the thumb left or right, or tap the left edge, center, or right edge for a quick adjustment.
(5) Movie bus previews ( call buttons): Displays a thumbnail for the movie loaded into the bus. Under the PLAY mode, you can tap these buttons to select and load a movie from the media pool. To unload the movie from the bus, tap and hold on the call button.
(6) Bus playback buttons: Starts/stops the playback of the bus.
(7) Motion & particle playback button: Starts/stops motions set for the images and texts, as well as particle effects. By default, the button is synced with the mode switches, and motions and particle effects are always played. Use this button to pause motions and particle effects, or to start the VJ play with the motions and particle effects stopped.

(1) Bank tabs: The media pool can hold up to 240 media as 6 groups, referred to as "banks", each containing up to 40 media. Use these tabs to switch between the banks.
(2) Media slots: Used to register a media for your VJ play (under the EDIT mode), or to load a media during playback (under the PLAY mode).
Note that the behavior differs depending on the active mode.
You can register up to 40 media for each bank.
The same movie or image may be registered multiple times, regardless of the selected bank.
Under the EDIT mode, you can register media and access the settings view.
Under the PLAY mode, you can load the registered media onto the stage.
A slot with a media registered will be displayed with a colored frame.
Pink: Movie
Emerald green: Image
Orange: Text
Green: Particle effect
When a motion is configured for a media, the slot will be labeled with the motion icon.
Under the PLAY mode, the slot for the movie being played back on the stage will be labeled with the bus icon (A or B).
The slot for a media being displayed on the stage or currently selected will be displayed with a bold frame.

(1) Mode switch: Switches between EDIT mode and PLAY mode. The section will change appearance depending on the mode.
Under the PLAY mode:
The Global section is used mainly to support the VJ play.
(2) Total time: Displays the amount of time elapsed since switching to the PLAY mode.
(3) Current time: Displays the current date and time.
(4) Battery level: Displays the battery level. When the battery becomes low, the display will turn red. Recharge your iPad.
(5) Exteernal Output: Press this button to output a video, assuming you are able to output to an external display. If you press it while the video is playing, the playback will be paused.
Under the EDIT mode:
The Global section provides access to the media pool and various settings.
(6) Swap button: Swaps the media between 2 slots of the media pool.
(7) Delete button: Deletes (unregisters) the selected media. The media will not be deleted from your iPad.
(8) Delete All button: Deletes (unregisters) all media from the currently selected bank of the media pool.
(9) Movie button: Loads movies into COLORCODE VJ from your iPad’s camera roll or other apps.
(10) Picture button: Loads images.
(11) Text button: Opens the Text Settings view. Text and motions edited in the settings view will be registered into the media pool.
(12) Particle button: Opens the particle settings view for configuring the particle to be used.
(13) App Settings(Preferences) button: Opens the general settings screen.
This view is used to configure motion for your images and texts.
To open, tap an image or text in the media pool under the EDIT mode, or the "Motion" button on the Text Settings view.
For each image or text, you can configure the position, opacity, and scale for a particular timestamp. When a motion is assigned to an image or text, the corresponding slot of the media pool will be labeled with the motion icon.

Title bar
(1) Cancel button: Tap to exit and discard any changes made.
(2) OK button: Tap to exit and save all changes.
Key frame preview section
(3) The gray rectangle in the center represents the main output.
(4) Each numbered point (key frame) represents a display position. The numbering represents the display order (ascending order).
Key frame settings section
(5) Represents the key frames chronologically, allowing you to understand the progress of the motion within the overall timeframe. The numbering matches that on the key frame preview section.
(6) Indicates the currently selected key frame. Use < and > to move to another key frame, or tap directly on the desired key frame.
(7) Adds/deletes a key frame. When adding a key frame, the frame is added after the last frame. When deleting a key frame, the last frame is deleted first.
When key frame is (0), there is only one frame, i.e. there is no motion.
Alpha (opacity) and scale can still be configured.
You create up to 10 key frames.
Key frame details settings section
Sets the details for each key frame.
Select the target key frame by tapping on the key frame preview section or by selecting on the key frame setting section.
(8) Time: Sets the time elapsed since the first key frame (0). When the last key frame is selected, you can also set the total length of the motion.
(9) X, Y: Sets the X and Y position, where 1 is the full height/width of the main output.
(10) Alpha: Sets the opacity.
(11) Zoom: Sets the display scale within a range of 0 to 5.
(12)Easing:Sets the interpolation trend for smoother transition from the previouse key frame to the current.
(13)Toolbar: Copy, Pate, Clear the motion, Loop setting, Resize.
Supported devices
iPad, iPad 2 (Wi-Fi/Wi-Fi+3G)
*iPad 2 recommended
iOS 4.3.5 and later
Video output requires an external display and a compatible adapter.
Available adapters:
Apple Digital AV Adapter
Apple VGA Adapter
Use additional cables as necessary for connection between the adapter and the monitor.
When using the Apple Digital AV Adapter, audio output via HDMI is also supported.
Users of iPad 1 should also refer to [1-8. Using COLORCODE VJ on iPad 1].
Movie files
.mov/.m4v/.mp4 files compressed using H.264
Aspect ratio to follow that of the main output display.
Recommended maximum resolution (for movies and external display):
iPad 2: 720x480, 800x600
iPad 1: 480x360
Bitrate: approx. 1.5Mbps
The above specifications is for your reference only, and does not in any way guarantee smooth playback even if all conditions are satisfied.
The smoothness of your VJ play will depend on various factors such as the resolution and number of images used, and the combination of particles. We strongly recommend rehearsing before the actual performance.
Image files
.png/.jpg
PNG transparency is supported.
Resolution close to that of the main video output is recommended.
COLORCODE VJ can use movies and images stored in your iPad’s Photos app. This means that iPad 2 users can use movies and photos taken with their iPad. Note, however, that the resolution of movies taken with iPad 2 significantly exceed the recommended resolution for COLORCODE VJ.
You can also use the File Sharing function in iTunes to transfer files directly from your Mac/PC to COLORCODE VJ.
[NOTE] Movies and images with excessively large resolution (i.e. with width or height greater than 2000 pixels) cannot be loaded. Such files will be listed in red.
Using iTunes' File Sharing function, you can transfer files directly from your Mac/PC to COLORCODE VJ.
Connect your iPad to your Mac/PC and launch iTunes.
Select your iPad from the DEVICES section.
Click the Apps tab, scroll down to the File Sharing section, and select COLORCODE VJ.

Drag the desired file to the COLORCODE VJ Documents list on the right, or tap the "Add..." button.
To remove a file from the list, select the file and press "Delete" on your keyboard.
While you can transfer multiple files at once, File Sharing does not support transferring or grouping by folders.
Note that while there is no limit to the number of files you can transfer, you will not be able to transfer files past the capacity of your iPad. Be sure there is enough free space on your iPad.
You can also use iTunes’ Photo Sync function to transfer images from your Mac/PC to COLORCODE VJ.
Note that iTunes may automatically convert the file format during the transfer.
This will not cause any problems, however, as all files will be converted into a format and resolution supported by COLORCODE VJ.

<Procedure>
Connect your iPad to your Mac/PC and launch iTunes.On the "Photos" tab for your iPad, select the source of the images under the "Sync Photos from" section.
Use the dropdown list to select the folder that contains the desired images.
Select the "Include videos" checkbox.
Make other selections as necessary.
*[NOTE] Note the following when using the Photo Sync function.
Adding and deleting folders may cause a video file to be misidentified as a different file.
This will cause a dead link in COLORCODE VJ, even if the video file actually exists. To resolve this issue, retransfer the video file.
You can copy movie files from other apps to COLORCODE VJ. It is called iOS's Open In or shared function. These functions are operated from the app that becomes the copy source, but the name may differ depending on the app. In many cases, you can use the function from the icon like the image below.

When the icon is pressed, the shared sheet is displayed and if the COLORCODE VJ icon is displayed there, copy the file by selecting COLORCODE VJ.

Even if the COLORCODE VJ icon as shown below is not displayed, select "Save to file" and select "
If you choose "On My iPad" → "Colorcode VJ", you may be able to save the file directly in COLROCDE VJ.

If a format that can not be played with COLORCODE VJ is copied, it is ignored in COLORCODE VJ.
※ These functions will differ depending on the version of iOS, the correspondence status of the copy source application, etc., or the function will differ.
You can output your VJ play (main output) to an external display.
Connection with an external display requires an adapter (sold separately).
Select from the following options to match your external display.
- Apple Digital AV Adapter
- Apple VGA Adapter
- Apple Composite AV cable
You may also need to provide cables for connection between the adapter and the display.
Apple Digital AV Adapter allows you to output audio together with your video, as well as recharge your iPad.
Adapters can be connected to your iPad at any time, regardless of the status of COLORCODE VJ.
 |
You are unable to send an external output. Normally this indicates that the external output adaptor is not connected. |
 |
You are not sending an external output, even though you are able to do so. Tap the button to output the video to the external display. Please make your selection when you are shown a screen for selecting the output resolution. |
 |
Indicates that you are currently sending an external output. Tap the button to pause the connection. |

Select the desired resolution. Note, however, that your iPad may not have enough machine power to support larger resolutions. Use at 800x600 or less is recommended. (in particular, on iPad 1)
COLORCODE VJ can be used on both iPad 1 and iPad 2.
When using iPad 1, while there are no functional restrictions, you will need to note a few points due to the hardware limitations (lack of CPU power and available memory) of iPad 1.
- Use of movies with lower resolutions (more specifically, under 480x320) is recommended.
- The particle function is CPU intensive. When using particles, use movies and images with low resolution.
- COLORCODE VJ is a memory intensive app. We suggest closing all other apps before launching COLORCODE VJ. You may also wish to use memory maintenance apps to free up additional memory.