3. PLAY Mode in Details
|Page top|Main Contents|
3-1. Playing back media
3-1-1. Playing videos
Tap a call button in the Controller section, followed by the media pool slot containing the desired video.
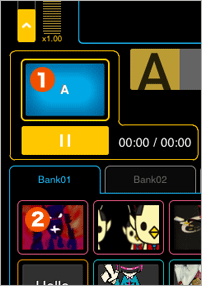
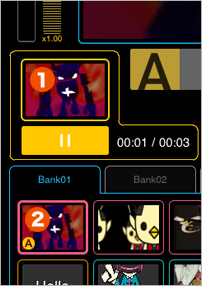
The video is loaded into the playback bus, and playback begins.The video will loop until the playback is stopped.
To unload the video from the bus, tap and hold on the call button.
When the call button is selected, it can be cue button. The playback position returns at the beginning of the video anytime.
When a video is loaded into both buses A and B, you can use the crossfader to adjust their mix balance.
When a text and a picture aren't displayed and a particle is not selected, and tap on the stage, it's possible to change A and B in an instant.
Use the seek bars and speed controls to adjust how the videos are played back.
You can scratch play by dragging to the left or right on the stage when playing only movies (images, particles, text are not selected).
|Page top|Main Contents|
3-1-2. Displaying images
Under the PLAY mode, tapping a media pool slot with an image registered will load the image onto the stage. Tapping the slot again will unload the image.
You can load up to 5 images onto the stage.
Images are layered in the order they are loaded (later images on top). You cannot change the ordering of the layer.
Normally (i.e. with the motion & particle playback button ON), any motion configured for an image is immediately played back when the image is loaded. When the motion & particle playback button is OFF, the motion will remain paused at the first frame until the button is turned ON.
You can move and resize images by dragging and pinching on the stage.
(The display on the stage may seem jumpy. This is to minimize the load on the CPU. Output to the external display will be smooth.)
You cannot modify images while an associated motion is being played back.
While you are sending an output to an external display, no images are displayed on the stage. The stage displays an area of that image. (Specification to be changed from Ver 1.4.0.)
You can drag the region to move it, or pinch it to zoom in or out. This functionality works in the same way as the previous version.
If you have image motion set, only the display position and zoom will be reflected in that area.
|Page top|Main Contents|
3-1-3. Displaying texts
Texts can be displayed in the same way as images.
Handling of motions is also identical.
The difference is that you can only load 1 text at a time.
While you are sending an output to an external display, no text is displayed on the stage. The stage displays an area of the text. [[[(Ver1.4.0から仕様変更)]]]
If you have text motion set, only the display position and zoom will be reflected in that area.
|Page top|Main Contents|
3-1-4. Playing particles
When the motion & particle playback button is ON, you can place particles onto the stage by first tapping on a media pool slot containing a particle, and then tapping or dragging on the stage.
When the motion & particle playback button is OFF, particles are not displayed even if you tap on the stage.
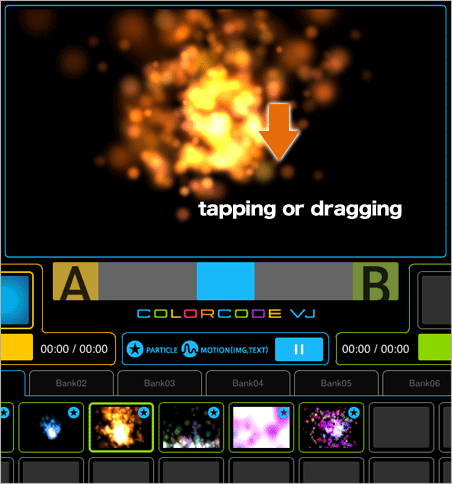
You can only use 1 particle at a time.Since particles are placed on a layer above images, you will not be able to move images by tapping and dragging while using particles. While the text layer is above the particle layer, particles can be used simultaneously with texts, as there is no capability to manipulate texts on the stage by tapping.
While you are sending an output to an external display, no [[[Particle]]]s are displayed on the stage.
This functionality works in the same way as the previous version in that you can tap on the stage to display a particle in that position.
|Page top|Main Contents|
3-2. Music Player
The Music Player is essentially an independent function within COLORCODE VJ.

The Music Player will automatically stop when switching between PLAY mode and EDIT mode, but can be used under both modes.
The Music Player can play tracks from your iPad’s iPod library.
Note that DRM protected tracks purchased on the iTunes Music Store cannot be played. iTunes Plus tracks are DRM-free and can be played.
|Page top|Main Contents|
3-2-1. Selecting tracks
Tap the track selection button.
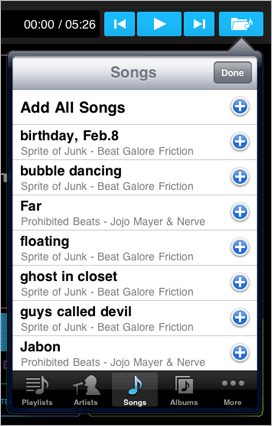
From the list view, select tracks in the order you wish to them to be played back.
To correct the ordering, exit the view once, and restart from the beginning.
When done, tap "Done".
There is no limit to the number of tracks you can select.
You can even select all tracks in your iPod library.
|Page top|Main Contents|
3-2-2. Playing tracks
Tap the play button to start playback of the playlist.

Tap the Next button to skip to the next track.

When there is only 1 track in the playlist, you will be taken to the beginning of the track.After the last track in the playlist, you will be taken back to the first track.
The Back button, when pressed during the first 5 seconds of a track, will take you to the previous track. When pressed after the first 5 seconds, you will be taken to the beginning of the track.

When there is only 1 track in the playlist, you will be taken to the beginning of the track. When at the first track in the playlist, you will be taken to the last track.
The display shows the title, elapsed time, and length of the current track
|Page top|Main Contents|